My Sublime Text 3 Setup
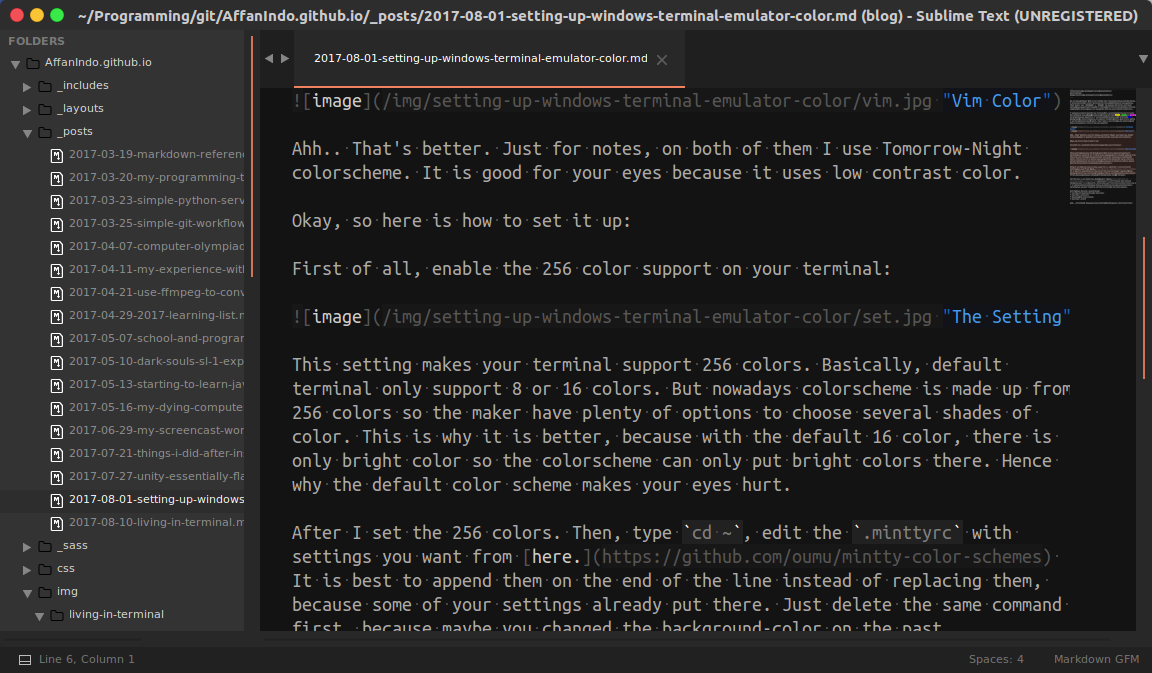
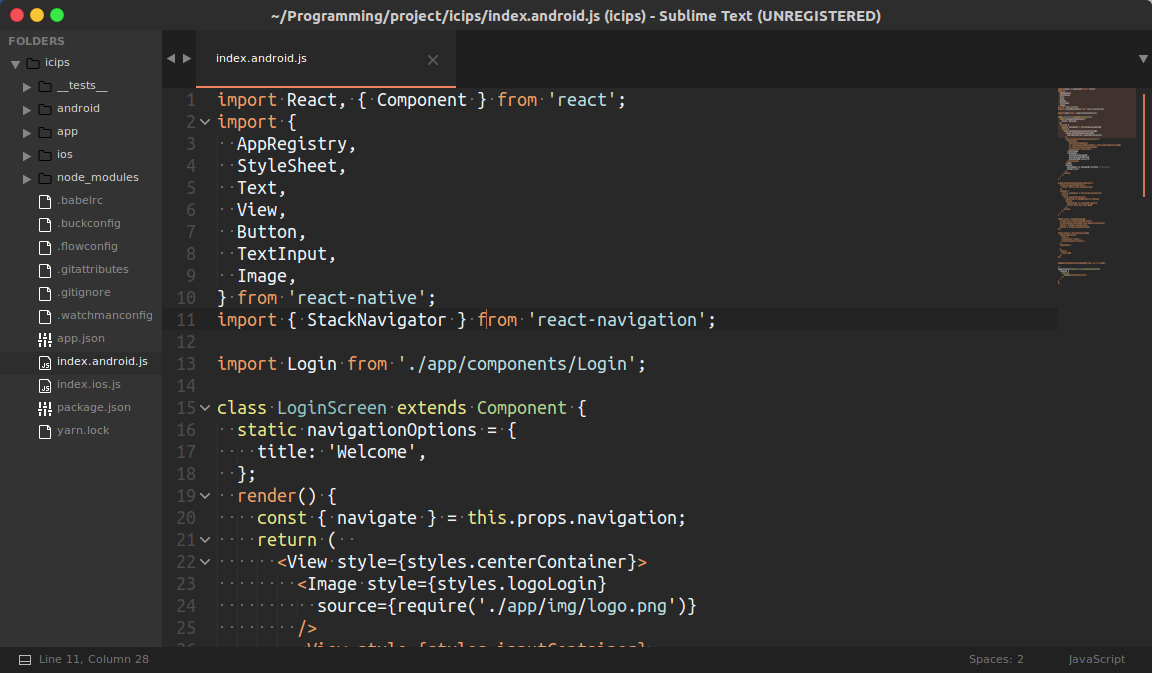
Today I will share you how to set up your Sublime Text 3 so it will look like mine.


This post will serve as a note for myself in the future on how to setup Sublime Text 3 if somehow I forget about it. But I will not maintain this post as my settings changes so make sure to check out my dotfiles. Without furher ado, here we go.
Font

For font, I use Ubuntu Mono. Make sure you use the Ubuntu Monospace, though. In programming, we use monospaced font because it will show constant width so our table and formatting will look nice.
My favorite thing from Ubuntu Mono is the curviness of some letter. For example you can see the letter i and letter l. This make programming easier since some letter looks identical (i, l, 1, |, etc), also it has number 0 with dots in it to make it different from o or O. Choose a programming font that didn’t make you confused, lad.
Theme and Colorscheme
I use the same for both Theme and Colorscheme. It is Predawn. This is the main visual changer in my setup. You see the orange tint and blocky tabs? that’s Predawn’s work. It is advised to install package using package manager (unfortunately sublime didn’t have that builtiin yet so you have to search the tutorial on how to install it). After you install it, just press ctrl+shift+p and Sublime will open you command palette. In this command palette, type install and select for Package Control: Install Package, then search Predawn and press enter to install it! easy.
You can activate the package by editing your settings (which I will show at the end of this post) or use menu Preferences > Color Scheme > Predawn > predawn and Preferences > Color Scheme > User > Color Highlighter > themes > predawn. After changing the option/preferences, restart your sublime by closing it then opening it again.
Packages
- Package Control - This is the one where I said you have to install it manually. This package provides a package manager inside Sublime Text 3
- SideBarEnhancements - By default, Sublime Text 3 has a little options in the sidebar (press ctrl+k ctrl+b to open it). This package add a whole lot options in your sidebar.
- Predawn - I made a section just for this above.
- All Autocomplete - Instead of autocompleting from a file, this package let you to autocompleting from whole file opened, so if somehow your variables is in another source code, this package knows it.
- Color Highlighter - When you type a color in hex code, it will highlighted to the corresponding color.
- Emmet - Press
div<tab>and Emmet will autocomplete the tag. There are many features in Emmet that will makes your life whole lot easier. - Hayaku - This one is for CSS. Press
fz10px<tab>and Hayaku will autocomplete it tofont-size: 10px;. Or presstac<tab>and Hayaku will autocomplete it totext-align: center;. You don’t actually need to remember all the shorthand lists, just short it on the go. You can usetac,txalc,tacen,txalcen, it’s all the same for Hayaku. With Hayaku, just think about which one you want to use then just type it out! - MarkdownEditing - The package I use for writing this blog post haha! This package will bold or italic the word if you use the markdown syntax for bold or italic, it will highlight the link too, also it will shows you the bullet points, and many more! this package is essential for writing Markdown. Change the color theme of your Markdown Editing with
Preferences > Color Scheme > MarkdownEditing > MarkdownEditor-Dark. - Babel - My must have package listed above. From here downwards is optional package. This package is for better syntax highlighting in variant of JavaScript like TypeScript, CoffeeScript, etc. I work with React Native and Sublime Text 3 will make all the text wrongly colored. This package correct it.
- react-native-snippets - Just nice addition for working with React Native ;)
Settings
Just a blob of text here. If you want to see the latest version, check my dotfiles.
{
    "bold_folder_labels": true,
    "color_scheme": "Packages/Predawn/predawn.tmTheme",
    "draw_white_space": "all",
    "fade_fold_buttons": false,
    "folder_exclude_patterns":
    [
        ".svn",
        ".git",
        ".hg",
        "CVS",
        "_build",
        "dist",
        "build",
        "site",
        "__pycache__",
        "_offline"
    ],
    "font_face": "Ubuntu Mono",
    "font_size": 14,
    "highlight_line": true,
    "highlight_modified_tabs": true,
    "ignored_packages":
    [
        "Vintage"
    ],
    "line_padding_bottom": 1,
    "line_padding_top": 1,
    "predawn_tabs_active_underline": true,
    "preview_on_click": false,
    "save_on_focus_lost": true,
    "tab_size": 4,
    "theme": "predawn-DEV.sublime-theme",
    "predawn_tabs_active_underline": true,
    "translate_tabs_to_spaces": true,
    "update_check": false,
    "word_wrap": true
}
When writing Markdown files, pressing ctrl+b will convert the file to html. If you don’t want to do that. Then add { "keys": ["ctrl+b"], "command": "build" } to your Default.sublime-keymap.
Conclusion
And that’s it my settings for my Sublime Text 3! I hope you enjoy this post :)